
Building Elective Lines
Setup required prior to generating lines
There are several places where options exist which affect the way lines are generated. It is recommended that the following checks are made before generating lines.
- In Electives > Setup, check that you have entered the correct number of lines, units per line and periods per line. If you are wanting to generate lines under another year level check that the relevant year level has been selected in the 'Generate under' field. Enter the correct letter or number for the first line. Save any changes.
- In Electives > Offered courses, use the Lines column to specify on which line specific courses must be placed. Use this sparingly, as it reduces flexibility when generating lines. A better option is to vlink classes or use the Class constraints table. For more information on the Class constraints table, see this article.
- In Electives > Offered courses, use the Constraints column to vertically link (vlink) any courses that must run on the same line, or horizontally link (hlink) any courses that must be placed on different sublines within a line.
- In Electives > Offered courses, in the Selection Rules table, there is an option called 'Mandatory if selected'. You can use this to ensure that students who select a particular course are assigned to that course.
- In Electives > Subject selection > Student requests, check that all choices have been pulled in. Also check the 'Problems' column for any student whose choices may have violated the selection rules specified in the 'Rules' table in the Offered Courses screen. This may happen if choices have been entered manually.
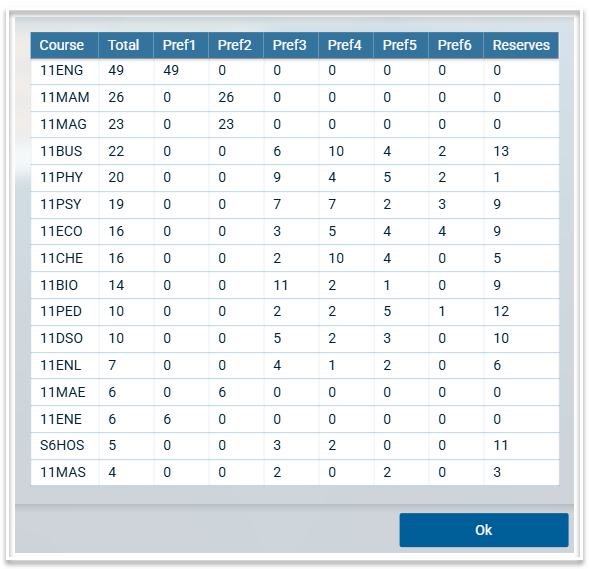
- Decide which courses, if any, will not run, and which courses will require additional classes, based on student selections. Update the #Classes column in the Offered courses table accordingly. Note that you can also use the 'Throw away' column in Electives > Lines to specify which classes will not run. The Popularity table report, found under Electives > Analytics, is beneficial to help make these decisions.
Line Generation
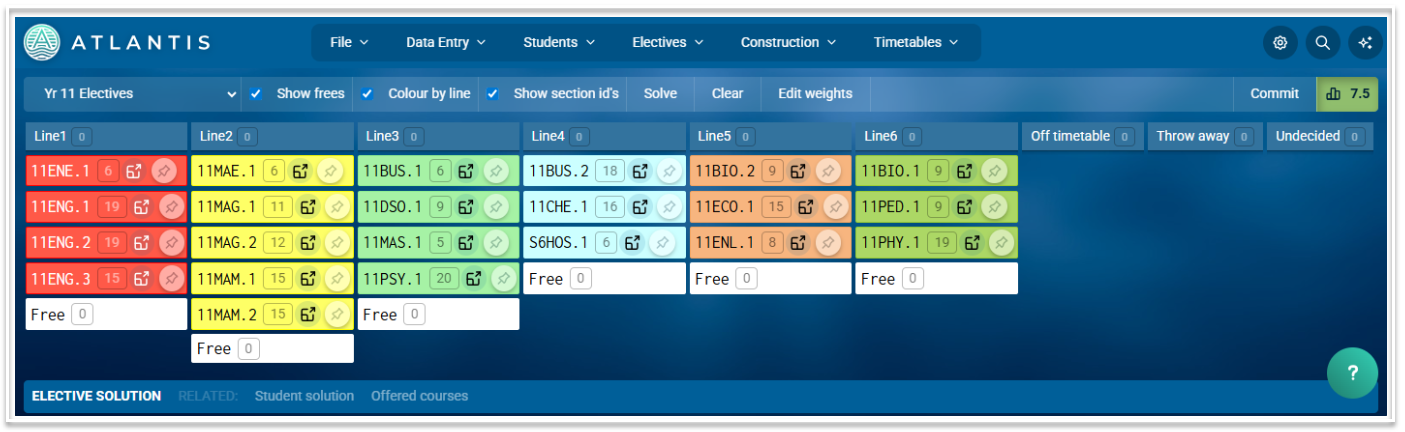
- To generate lines, or to create lines manually, go to Electives > Lines.
- Select the dataset from the dropdown list in the top left of the screen.
- Classes which have not been placed on a line will appear in the Undecided column.
- Place classes in the 'Off timetable' column if required. These classes will still run, but in early morning or lunchtime classes, i.e. outside the normal timetable. Atlantis's algorithms do not place off-timetable classes, instead you arrange them yourself, manually.
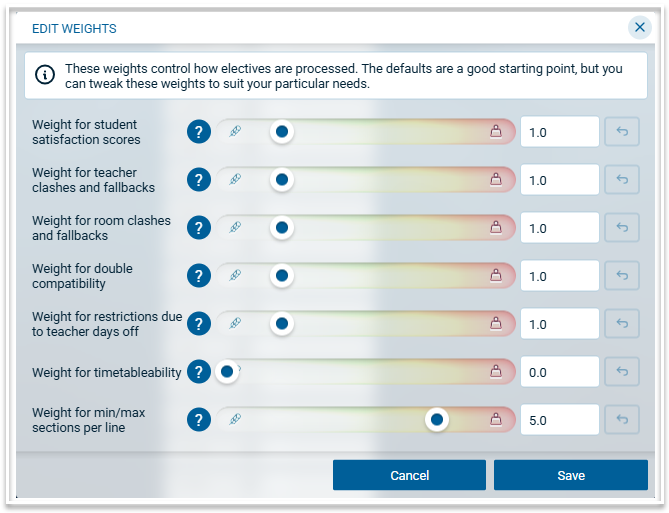
- A set of weights exists to control how the algorithm places classes on lines. The default weights are a good starting point but they can be adjusted to suit your particular requirements.
- To place a class manually on a line, drag the class from the Undecided column and drop it on the required line.
- Use the pin icon to pin a class to a line.
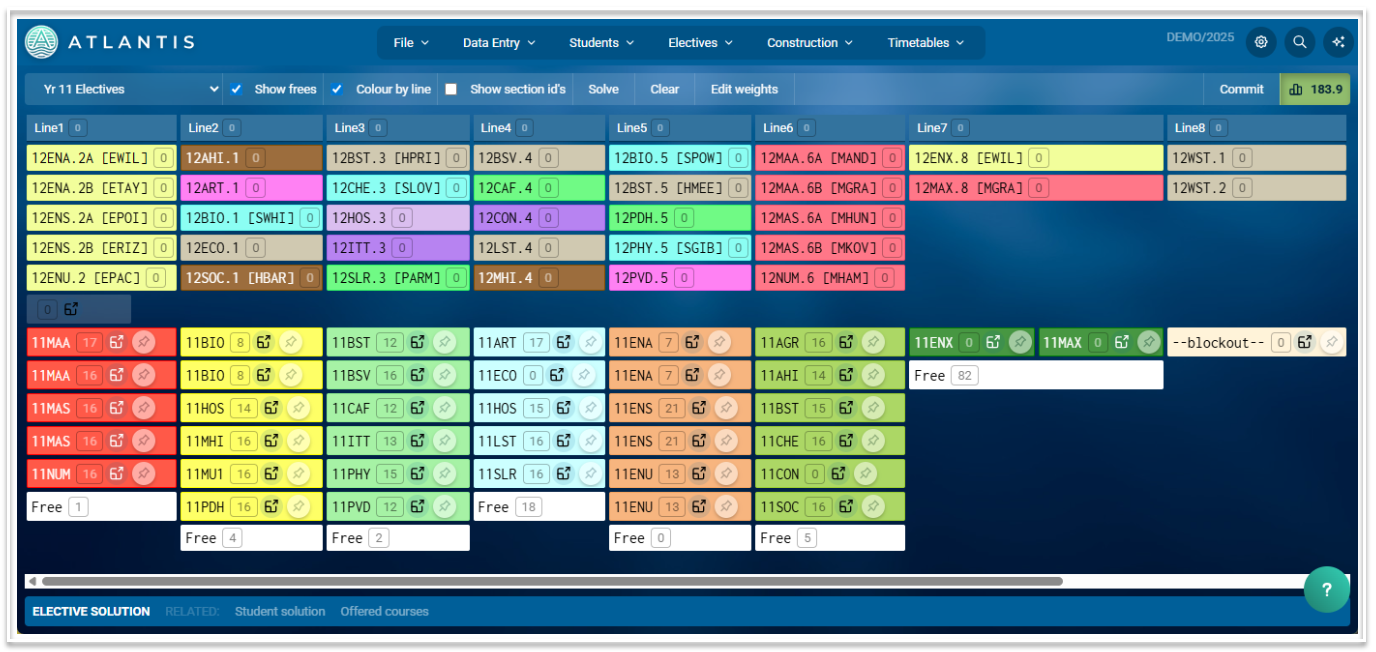
- Use the 'Solve' button in the toolbar to let the Atlantis algorithm place classes on lines. Pinned classes will not move during this process. If the arrangement is not quite to your liking then you might be able to get a better result by tweaking the score weights and using 'Solve' again. A generated line solution is shown below.
- The number of students placed in each class will be displayed.
- To see a list of the students who have been assigned to a class, click on the 'View students' icon, which is next to the pin icon.
- The tool bar contains options for displaying the lines including 'Show frees', which will show the number of students not in classes on a line, 'Colour by Line' which will toggle between line colours and course colours and 'Show section ids' which will display the class codes.
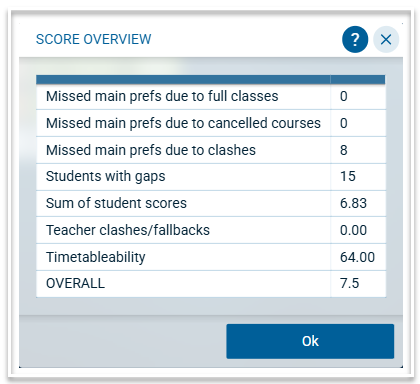
- A score will be generated by the algorithm, which can be seen in the top right corner of the screen. Clicking on the score will display a summary of the score components.
- To clear unpinned classes from the lines, use the 'Clear' button.
- Use the links in the footer to see these related screens: Student solution and Offered courses.
Generating lines under another year level
When the option to 'Generate under' is selected in Setup, the Lines screen will display the lines of the 'Generate under' year level at the top of the screen, with the lines to be generated for the selected dataset below. The classes on the lines of the top year level cannot be moved. When the selected dataset occupies fewer lines than the year level it is generated under, one or more 'blockout' objects will appear in the place of a line. You can move blockout objects and pin them if required or you can let the algorithm decide on the best place for them.
Committing Lines
When you are satisfied with the arrangement of the Lines, use the 'Commit' button in the toolbar to translate the line solution into the timetable Structure. You will see the lines solution in the Data entry > Structure screen, ready to be timetabled.