
Importing Data
Data can be imported easily into Atlantis using a csv file
How to import data
- Create a csv file with the required data. Column headers are recommended but not essential. The columns in the import file do not need to be in the exact order of the columns in the table you are importing into, as Atlantis will match them where possible. You can manually match columns that are not mapped automatically.
- Navigate to the required data table.
- Select the import button. A message will appear directing you to drag the file onto the screen.
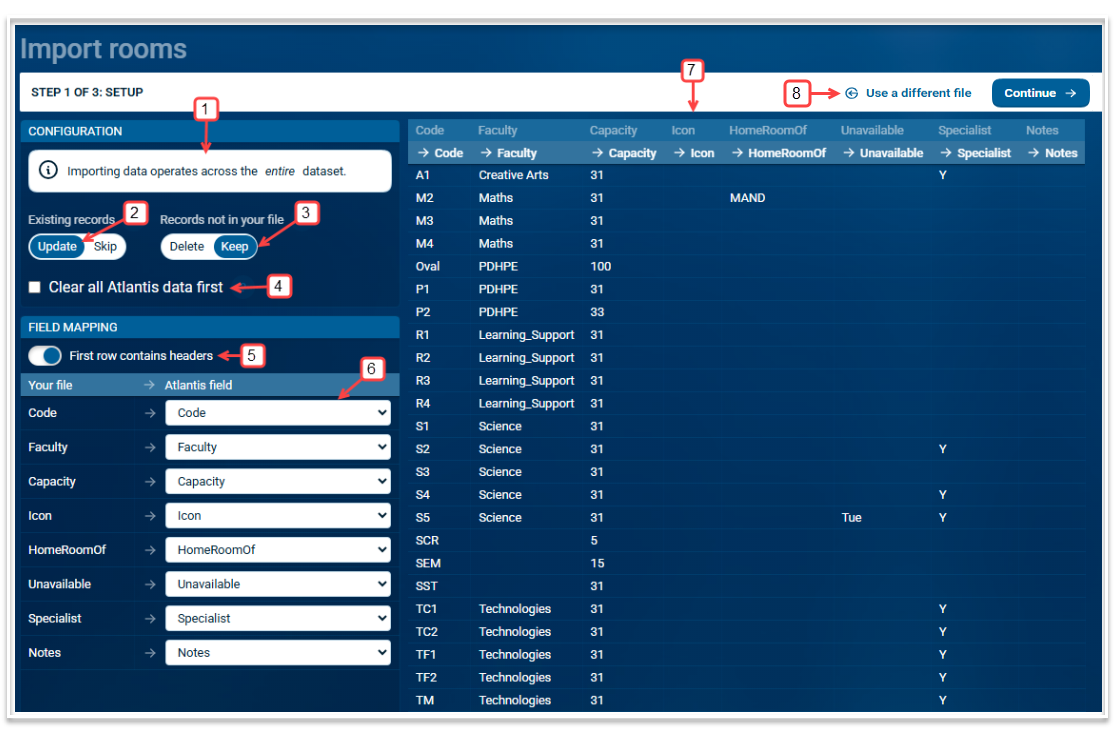
- Once you drag the file onto the screen, the following layout displays. This is the setup step where you configure the import.
1) Note the warning message here: Regardless of what filters are selected for the table into which you are importing, the import will update data across the entire dataset. For example, if you are importing into the Courses table and have selected Year 7 in the year filter, you will be updating data across all year levels when importing, not just Year 7. Therefore it is important to select the configuration options very carefully.
2) For existing records, select whether you want to update records that are in both Atlantis and in your import file or skip them. The default here is update and is the recommended option.
3) For records that are not in your import file but do exist in Atlantis, select whether you want to keep them or delete them. The default here is keep and is the recommended option. Remember that the import will affect all data in the table regardless of filters.
4) If you want to clear all data across the entire dataset before importing, select this checkbox but use with caution. This warning message appears when this is selected.5) Does your import file have headers? When toggled on, the headers in the import file will display. When toggled off, generic column labels will display ( Column 1, Column 2 etc).
6) Match the column headers in the import file to the Atlantis fields. This will be prepopulated if Atlantis can find a match. If no match is found, select an option from the drop down list.
7) Check the data that is to be imported.
8) If the data is correct, select 'Continue'. If it is not correct, select 'Use a different file' to go back and upload a new file. - When continue is used, you will be taken to the validation screen.
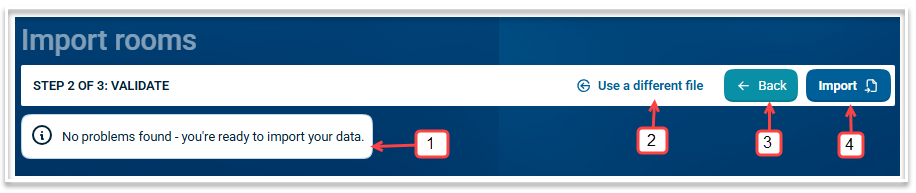
1) If Atlantis detects any issues with your data, they will be displayed. If no issues are found, a message indicating this will appear.
2) Select 'Use a different file' to return to the file upload screen if you do not want to proceed with the import and you want to try a different file.
3) Use the 'Back' option to return to the setup screen.
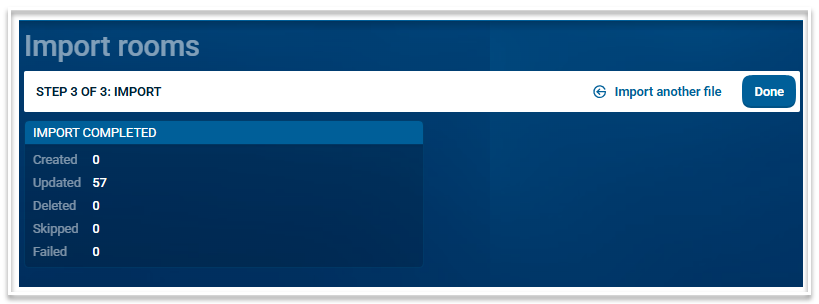
4) If no issues are displayed and you wish to complete the import, select the 'Import' button. Your data will imported and the following screen opens. Information about the number of records that have been created, updated, deleted, skipped and failed is displayed.
If you wish to import more data, select 'Import another file' otherwise select 'Done'.
Recommendation
Test the import in a copy of your file before importing into the official file to confirm that you are importing the correct data.